
Interrupts Lab Assignment
Objective
To learn how to create a single dynamic user defined interrupt service routine callback driver/library.
This lab will utilize:
- Lookup table structures
- Function pointers
- Constexpr and static
- Interrupts
- LPC40xx MCU gpio supports rising and falling edge interrupts on certain pins on port 0 and 2
- These port/pin interrupts are actually OR'd together and use a single CPU interrupt called GPIO_IRQ
Port Interrupts
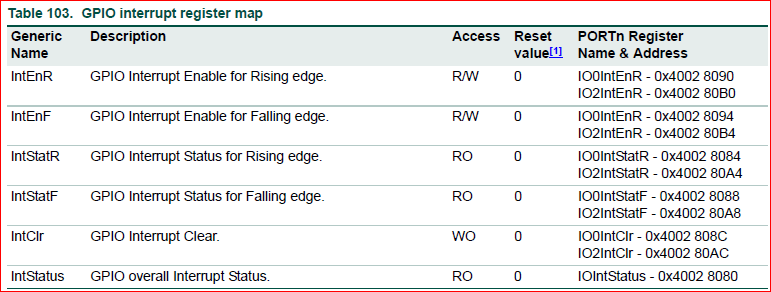
You will configure GPIO interrupts. This is supported for Port 0 and Port 2 and the following registers are relevant.
Assignment
Part 0: Simple Interrupt
The first thing you want to do is get a single Port/Pin's interrupt to work.
void GpioInterruptCallback()
{
  // 4) For the callback, do anything such as printf or blink and LED here to test your ISR
  // 5) MUST! Clear the source of the GPIO interrupt
}

void main(void)
{
  // 1) Setup a GPIO on port 2 as an input
  // 2) Configure the GPIO registers to trigger an interrupt on P2.0 rising edge.
  // 3) Register your callback for the GPIO_IRQn
  RegisterIsr(GPIO_IRQn, GpioInterruptCallback);

  while (1)
  {
    continue; // Empty loop just to test the interrupt
  }
}
Code Block 1. Basic Interrupt Test
Part 1: Extend the LabGPIO driver
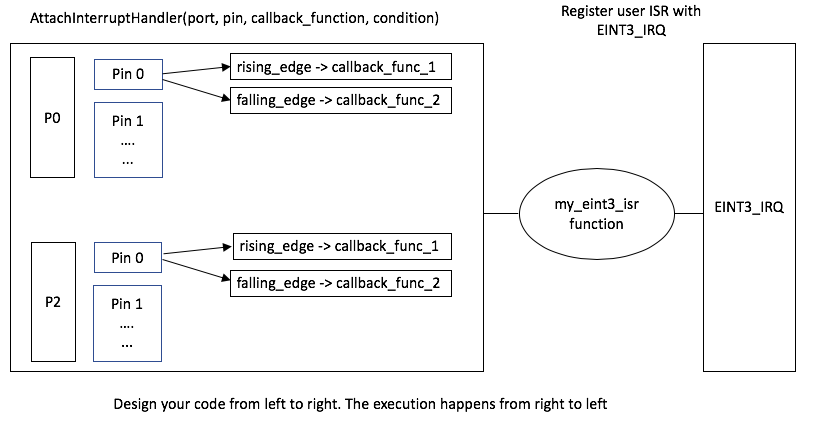
You are designing a library that will allow the programmer using your library to be able to "attach" a function callback to any and each pin on port 0 or port 2.
- Add and implement ALL class methods.
- All methods must function work as expected by their comment description.
#pragma once

// Gives you access to
#include "L0_LowLevel/interrupts.hpp"

class LabGPIO
{
 public:
  enum class Edge
  {
    kNone = 0,
    kRising,
    kFalling,
    kBoth
  };
  static constexpr size_t kPorts = 2;
  static constexpr size_t kPins = 32;
  // This handler should place a function pointer within the lookup table for
  // the GpioInterruptHandler() to find.
  //
  // @param isr  - function to run when the interrupt event occurs.
  // @param edge - condition for the interrupt to occur on.
  void AttachInterruptHandler(IsrPointer isr, Edge edge);
  // Register GPIO_IRQn here
  static void EnableInterrupts();
 private:
  // Statically allocated a lookup table matrix here of function pointers
  // to avoid dynamic allocation.
  //
  // Upon AttachInterruptHandler(), you will store the user's function callback
  // in this matrix.
  //
  // Upon the GPIO interrupt, you will use this matrix to find and invoke the
  // appropriate callback.
  //
  // Initialize everything to nullptr.
  static IsrPointer pin_isr_map[kPorts][kPins] = { nullptr };
  // This function is invoked by NVIC via the GPIO peripheral asynchronously.
  // This ISR should do the following:
  //  1) Find the Port and Pin that caused the interrupt via the IO0IntStatF,
  //     IO0IntStatR, IO2IntStatF, and IO2IntStatR registers.
  //  2) Lookup and invoke the user's registered callback.
  //
  // VERY IMPORTANT!
  //  - Be sure to clear the interrupt flag that caused this interrupt, or this
  //    function will be called repetitively and lock your system.
  //  - NOTE that your code needs to be able to handle two GPIO interrupts
  //    occurring at the same time.
  static void GpioInterruptHandler();
};

// ...

int main(void)
{
  // This is just an example, use which ever pins and ports you like
  Gpio gpio(2, 3);
  gpio.EnableInterrupts();

  while(true)
  {
    continue;
  }
  return 0;
}
Code Block 2. GPIO Interrupt Driver Template Class
Requirements
- Should be able to specify a callback function for any port/pin for an exposed GPIO given a rising, falling, or both condition.
- We may ask you to change which port and pin causes a particular callback to be executed in your code and then recompile and re-flash your board to and prove it works with any port 0 or port 2 pin.
- You will need to use two external switches for this lab.
Note that printing 4 chars inside an ISR can take 1ms, and this is an eternity for the processor and should never be done, unless other than debug.
What to turn in:
- Place all relevant source files within a .pdf file.
- Turn in the screenshots of terminal output.