RTOS
Topics for a general RTOS with a focus on FreeRTOS
Development Enviornment
Setup Development Environment
Setup Environment
- Install docker for your machine
- If you have linux, install docker for linux
- If you have Mac, install. docker for mac
- etc.
- Clone the SJ2-C repository
git clone https://gitlab.com/sjtwo-c-dev/sjtwo-c.git
- Open the folder you just cloned in VSCode
-

Build the Docker container
Building the docker container means that you are building the docker container that will ultimately build the RTOS simulator code and let you run that code.
python ./run setup

Use Docker to build FreeRTOS simulator executable
Once you have built your docker image using the python ./run setup command, you can now shell into the Docker container to build and run the RTOS simulator:
# Shell into the Docker container
./run shell

# If shell is successful, you will see something like this at the command-prompt:
#root@9b9c100d9f83:~/sjtwo-c

# Build a native executable using the "scons" build system:
scons --project=x86_freertos

# Run an executable in the Docker container
_build_x86_freertos/x86_freertos.exe
Another alternate option is that you could run these commands without shelling into the Docker container:
# Build a native executable
./run build -- --project=x86_freertos

# Run an executable in the Docker container
./run exe -- _build_x86_freertos/x86_freertos.exe
Stack Memory
I am sure a lot of you have used stackoverflow.com right? Stack overflows is one of the hardest problems to catch and diagnose, and thus no wonder someone invented this creative website URL.
Stack Memory consumers
Stack memory is required for the following:
- Local Variables: Stored in the stack frame and automatically cleaned up when the function exits.
- Function Calls: When a function is called, a stack frame is created and pushed onto the stack.
- Function Returns: When a function completes, its stack frame is popped off the stack.
Fundamentally, a single core CPU contains a "Stack Pointer" which is a hardware register keeping track of memory. When a compiler generates code for a local variable, the stack pointer is typically decremented to make space for that variable.
void example_function() {
  int local_variable;
}

// Assembly:
example_function:
    push {lr}                   // Save the link register (return address)
    sub sp, sp, #4              // Decrement the stack pointer by 4 bytes to allocate space for localVariable
    ...
    add sp, sp, #4              // Clean up the stack by incrementing the stack pointer
    pop {pc}                    // Restore the link register and return from the function
POSIX Thread
Let us experiment with a POSIX thread and visualize the stack usage.
#include <pthread.h>
#include <unistd.h> // sysconf()

#include <stdlib.h>
#include <stdio.h>
#include <stdint.h>

void* thread_entry(void *p) {
  //puts("Hello from thread");

  //uint8_t memory[280 * 1024] = { 0 };
  //uint8_t *memory = malloc(1 * 1024 * 1024);

  return NULL;
}

void *allocate_stack(const size_t stack_size_in_bytes) {
  const size_t align_to = sysconf(_SC_PAGESIZE);
  void *aligned_stack_ptr = aligned_alloc(align_to, stack_size_in_bytes);
  return aligned_stack_ptr;
}

void posix_thread_experiment() {
  void *thread_stack_mem_ptr = NULL;
  pthread_t posix_thread = {0};
  pthread_attr_t pthread_attributes = {0};
  const size_t stack_size = 256 * 1024;

  int status = pthread_attr_init(&pthread_attributes);
  if (0 == status) {
    //puts("Success: pthread_attr_init()");
    thread_stack_mem_ptr = allocate_stack(stack_size);
    status = pthread_attr_setstack(&pthread_attributes, thread_stack_mem_ptr, stack_size);
  }

  ////////////////////////////////////
  // TODO:
  ////////////////////////////////////
  // Write a pattern on all of the memory that will be used for thread stack
  // In other words, you are writing a "watermark pattern"


  if (0 == status) {
    //puts("Success: pthread_attr_setstack()");
    status = pthread_create(&posix_thread, &pthread_attributes, thread_entry, NULL);
  }

  if (0 != status) {
    puts("ERROR: Failed to create thread");
  }

  // Wait for the thread to exit:
  pthread_join(posix_thread, NULL);

  // |----|   <- lower memory which is thread_stack_mem_ptr
  // |----|
  // |----|

  ////////////////////////////////////
  // TODO:
  ////////////////////////////////////
  // Count all the bytes with the watermark intact
  uint32_t unused_stack_space = 0;
  printf("Total bytes un-used: %u / %u\n", (unsigned)(unused_stack_space*sizeof(uint64_t)), (unsigned)stack_size);
}

int main(int argc, char **argv) {
  ////////////////////////////////////
  // TODO
  // How much memory is the main() thread launched with?
  //uint8_t memory[8 * 1024 * 1024] = { 0 };
  ////////////////////////////////////


  posix_thread_experiment();
  return 0;
}
Exercises
Exercise 1:
- Experiment and determine the maximum stack allocation size of the main() function
- You can modify size of allocated memory inside main() and assess when the program crashes or experiences a segmentation fault
- Complete the TODOs in the code to determine the stack usage of a thread
- Paint the allocated stack memory with a watermark pattern
- Count he number of stack memory bytes with un-altered pattern
- Experiment with various stack memory usage of the thread to determine if your algorithm is working
- Experiment with stack usage
- Note down how much stack space a printf() method takes
Exercise 2:
- Create two threads that perform some operations and sleep periodically
- Use about 128k stack space for each thread
- Create a thread monitoring thread (third thread)
- This thread should monitor the stack usage of each thread
- If stack free reaches < 4000 bytes, print out a warning message
- Periodically, every 5 seconds, print out stack usage of each thread
Tasks
The basics of why we need multiple tasks is covered at this article and is a recommended read:
vTaskDelay
vTaskDelay() is a naive function, but it is important to understand how it really works.
- The function expects a parameter in "tick time" (not necessarily in milliseconds).
- The function will sleep the current task for approximately the tick time.
- The function will trigger a "software interrupt" to perform a cooperative scheduling event and allow another task to run.
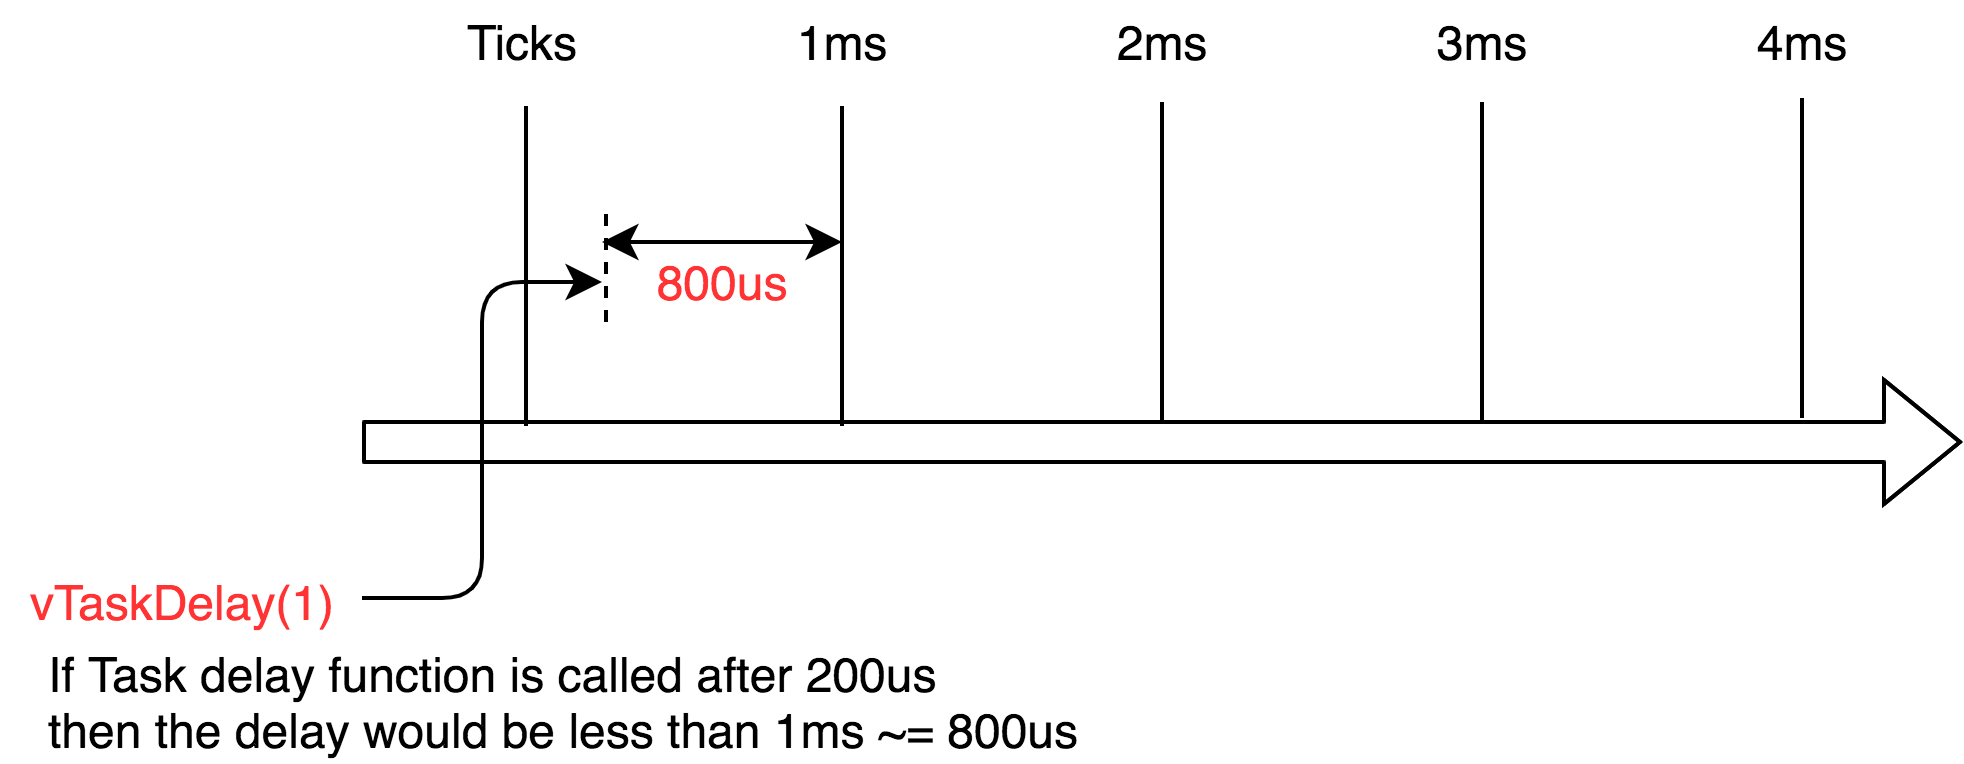
vTaskDelay(1)
For FreeRTOS configuration where 1 tick is 1 millisecond, the following is true:
- The function may sleep for less than 1 millisecond
If you use a vTaskDelay(1) Ideally, you will get a delay somewhere between 0ms and 1ms. If you ask for a 2 ticks delay, you will get a delay between 1ms and 2ms. The low end of the range happens if the vTaskDelay() is called right after the end of a tick as shown in the figure below.
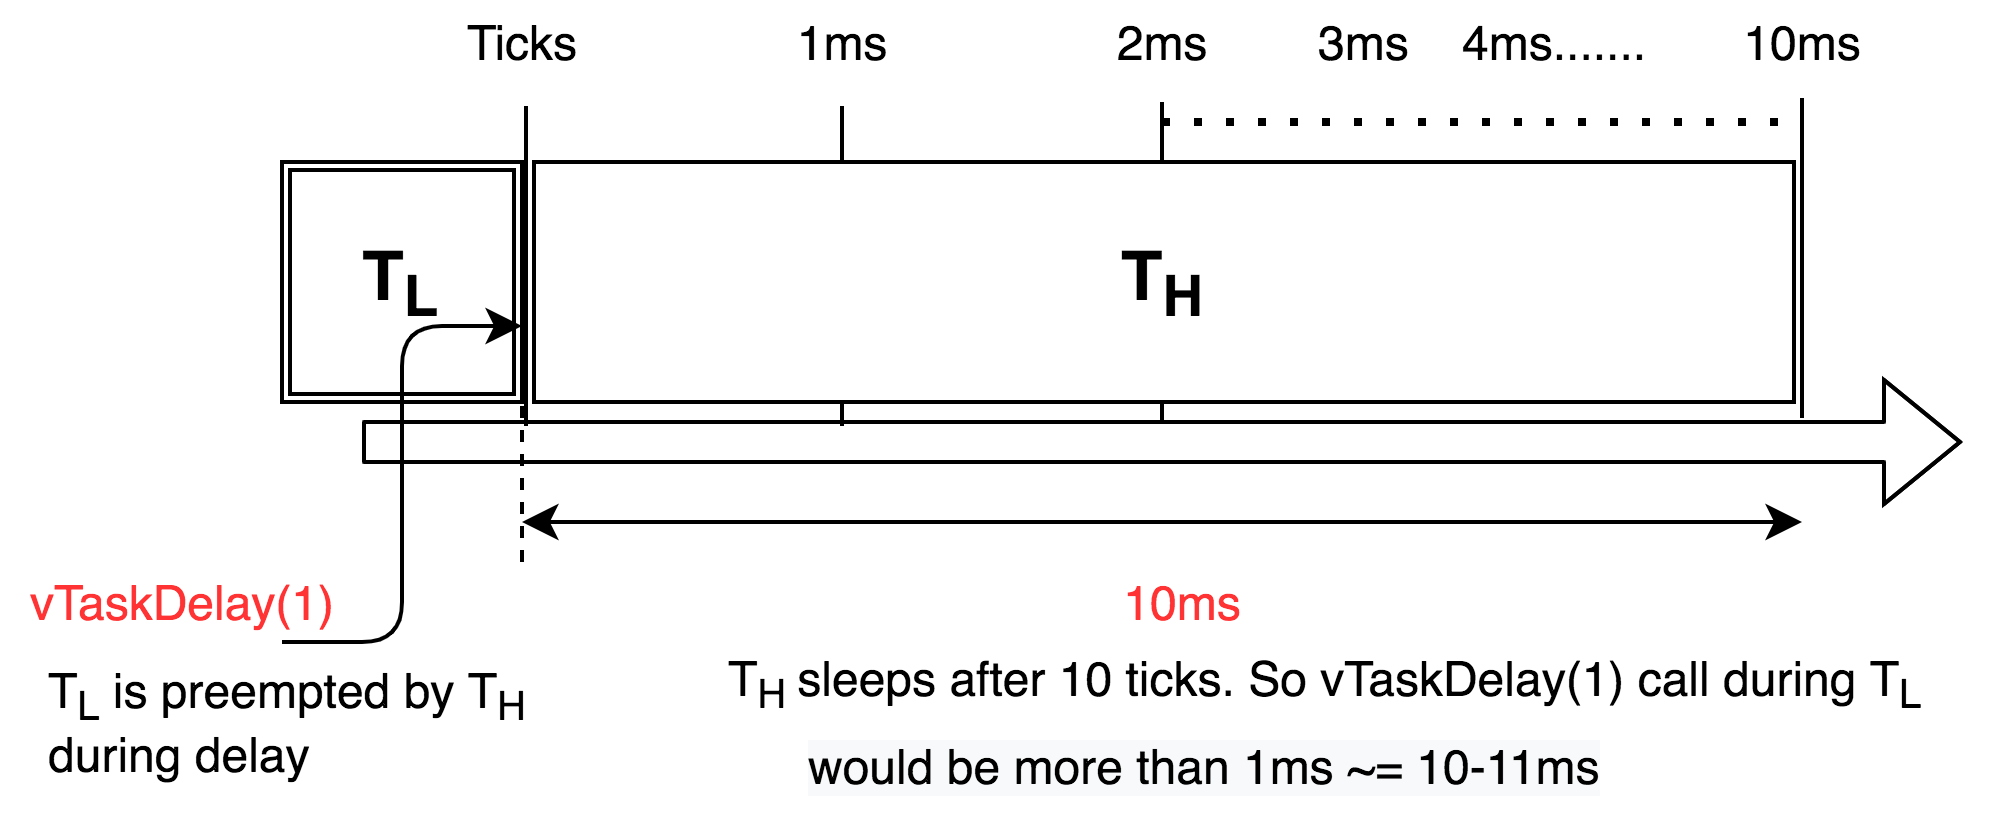
Assuming FreeRTOS configuration where 1 tick is 1 millisecond again, the following is also true:
- The function may sleep for more than 1 millisecond
The delay of course can also be extended if the currently running task is preempted by the higher priority task during the delay and takes over the CPU for some time or it never gives up the CPU. As the delay just affect when this task is eligible to get CPU time.
Queues
This article provides examples of using RTOS Queues.
Why RTOS Queues
There are standard queues, or <vector> in C++, but RTOS queues should almost always be used in your application because they are thread-safe (no race conditions with multiple tasks), and they co-operate with your RTOS to schedule the tasks. For instance, your task could optionally sleep while receiving data if the queue is empty, or it can sleep while sending the data if the queue is full.
Queues vs. Binary Semaphore for "Signal"
Binary Semaphores may be used to "signal" between two contexts (tasks or interrupts), but they do not contain any payload. For example, for an application that captures a keystroke inside of an interrupt, it could "signal" the data processing task to awake upon the semaphore, however, there is no payload associated with it to identify what keystroke was input. With an RTOS queue, the data processing task can wake up on a payload and process a particular keystroke.
The data-gathering tasks can simply send the key-press detected to the queue, and the processing task can receive items from the queue, and perform the corresponding action. Moreover, if there are no items in the queue, the consumer task (the processing one) can sleep until data becomes available. You can see how this scheme lends itself well to having multiple ISRs queue up data for a task (or multiple tasks) to handle.
Examples
Simple
After looking through the sample code below, you should then watch this video.
Let us study an example of two tasks communicating to each other over a queue.
QueueHandle_t handle_of_int_queue;

void producer(void *p) {
  int x = 0;

  while (1) {
    vTaskDelay(100);
    ++x;
    if (xQueueSend(handle_of_int_queue, &x, 0)) {
    }
  }
}

void consumer(void *p) {
  while (1) {
    // We do not need vTaskDelay() because this task will sleep for up to 100 ticks until there is an item in the queue
    if (xQueueReceive(handle_of_int_queue, &x, 100)) {
      printf("Received %i\n", x);
    } else {
      puts("Timeout --> No data received");
    }
  }
}

void main(void) {
  // Queue handle is not valid until you create it
  handle_of_int_queue = xQueueCreate(10, sizeof(int));
}
Queue usage with Interrupts
When an item is sent from within an interrupt (or received), the main difference in the API is that there is no way to "sleep". For example, we cannot sleep while waiting to write an item to the queue if the queue is full. FreeRTOS API has dedicated API to be used from within ISRs, and other RTOSs simply state that you can use the same API, but the sleep time has to be zero if you are inside of an interrupt.
With the FreeRTOS FromISR API, in place of the sleep time is a pointer to a variable that informs us if an RTOS scheduling yield is required, and FreeRTOS asks us to yield in our application code.
static QueueHandle_t uart_rx_queue;

// Queue API is special if you are inside an ISR
void uart_rx_isr(void) {
  BaseType_t yield_required = 0;
  if (!xQueueSendFromISR(uart_rx_queue, &x, &yield_required)) {
    // TODO: Queue was full, handle this case
  }

  portYIELD_FROM_ISR(yield_required);
}

void queue_rx_task(void *p) {
  int x = 0;
  // Receive is the usual receive because we are not inside an ISR
  while (1) {
    if(xQueueReceive(uart_rx_queue, &x, portMAX_DELAY)) {
    }
  }
}

void main(void) {
   uart_rx_queue = xQueueCreate(10, sizeof(char));
}
Advanced Examples
Multiple Producers and Consumers
There are multiple ways to create multiple producers and consumers. The easiest way to do so at the expense of a potentially excessive number of tasks is to have multiple tasks for each producer, and for each consumer.
static QueueHandle_t light_sensor_queue;
static QueueHandle_t temperature_sensor_queue;

void light_sensor_task(void *p) {
  while (1) {
    const int sensor_value = rand(); // Some random value
    if(xQueueSend(light_sensor_queue, &sensor_value, portMAX_DELAY)) {
    }
    vTaskDelay(1000);
  }
}
void temperature_sensor_task(void *p) {
  while (1) {
    const int temperature_value = rand(); // Some random value
    if(xQueueSend(temperature_sensor_queue, &temperature_value, portMAX_DELAY)) {
    }
    vTaskDelay(1000);
  }
}

void consumer_of_light_sensor(void *p) {
  int light_sensor_value = 0;
  while(1) {
    xQueueReceive(light_sensor_queue, &light_sensor_value, portMAX_DELAY);
    printf("Light sensor value: %i\n", light_sensor_value);
  }
}
void consumer_of_temperature_sensor(void *p) {
  int temperature_sensor_value = 0;
  while(1) {
    xQueueReceive(temperature_sensor_queue, &temperature_sensor_value, portMAX_DELAY);
    printf("Temperature sensor value: %i\n", temperature_sensor_value);
  }
}

void main(void) {
   light_sensor_queue = xQueueCreate(3, sizeof(int));
   temperature_sensor_queue = xQueueCreate(3, sizeof(int));

   xTaskCreate(light_sensor_task, ...);
   xTaskCreate(temperature_sensor_task, ...);

   xTaskCreate(consumer_of_light_sensor, ...);
   xTaskCreate(consumer_of_temperature_sensor, ...);
}
Multiple Producers, 1 Consumer
In order to create multiple producers sending different sensor values, we can "multiplex" the data values. The producer would send a value, and also send an enumeration of what type of data it has sent. The consumer would block on a single queue that all the producers are writing, and then it can use a switch/case statement to handle data from multiple producers sending different kinds of values.
static QueueHandle_t sensor_queue;

typedef enum {
  light,
  temperature,
} sensor_type_e;

typedef struct {
  sensor_type_e sensor_type;
  int value;
} sensor_value_s;

void light_sensor_task(void *p) {
  while (1) {
    const sensor_value_s sensor_value = {light, rand()}; // Some random value
    if(xQueueSend(sensor_queue, &sensor_value, portMAX_DELAY)) {
    }
    vTaskDelay(1000);
  }
}
void temperature_sensor_task(void *p) {
  while (1) {
    const sensor_value_s sensor_value = {temperature, rand()}; // Some random value
    if(xQueueSend(sensor_queue, &temperature_value, portMAX_DELAY)) {
    }
    vTaskDelay(1000);
  }
}

void consumer_of_light_sensor(void *p) {
  sensor_value_s sensor;
  while(1) {
    xQueueReceive(sensor_queue, &sensor, portMAX_DELAY);

    switch (sensor.sensor_type) {
      case light:          printf("Light sensor value: %i\n", sensor.value);
        break;
      case temperature:    printf("Temperature sensor value: %i\n", sensor.value);
        break;
    }
  }
}

void main(void) {
   sensor_queue = xQueueCreate(3, sizeof(sensor_value_s));

   xTaskCreate(light_sensor_task, ...);
   xTaskCreate(temperature_sensor_task, ...);

   xTaskCreate(consumer_of_sensor_values, ...);
}
Multiple Producers, 1 Consumer using QueueSet API
Before you explore this API, be sure to read FreeRTOS documentation about "Alternatives to Using Queue Sets". In general, this should be the "last resort", and you should avoid the QueueSet API if possible due to its complexity.
QueueSets is the most efficient way of blocking on multiple queues/semaphores. The semaphore_task is one of the producer tasks that give the semaphore at 1Hz, Queue1, and Queue2 handler in the light sensor and temperature task which randomly generates the data of light and temperature sensor. The idea of using queue sets in the consumer task is to wait on either the semaphore task or queues data.
static QueueHandle_t q_light_sensor, q_temperature_sensor;
static QueueSetHandle_t xQueueSet;
static SemaphoreHandle_t xSemaphore;

int generate_random_sensor_values(int lower, int upper) {
  int sensor_value = (rand() % (upper - lower + 1)) + lower;
  return sensor_value;
}

// runing @1Hz
void semaphore_task(void *p) {
  while (1) {
    vTaskDelay(1000);
    xSemaphoreGive(xSemaphore);
  }
}

// When u don't want to wait for queue/semaphore forever block on multiple queues
// Add data of light sensor to Queue1
void light_sensor_task(void *p) {
  while (1) {
    const int sensor_value = generate_random_sensor_values(10, 99);
    xQueueSend(q_light_sensor, &sensor_value, 0);
    vTaskDelay(500);
  }
}

//Add data of Temperature Sensor to Queue2
void temperature_sensor_task(void *p) {
  while (1) {
    const int sensor_value = generate_random_sensor_values(25, 85);
    xQueueSend(q_temperature_sensor, &sensor_value, 0);
    vTaskDelay(500);
  }
}

// Unblocks the task when any of the queues receives some data
void consumer(void *p) {
  int count = 0;
  int sensor_value = 0;

  while (1) {
    //xQueueSelectFromSet returns the handle of the Queue, or Semaphore that unblocked us
    QueueSetMemberHandle_t xUnBlockedMember = xQueueSelectFromSet(xQueueSet, 2000);

    if (xBlockedMember == q_light_sensor) {
      // Use zero timeout during xQueueReceive() because xQueueSelectFromSet() has
      // already informed us that there is an event on this q_light_sensor
      if (xQueueReceive(xUnBlockedMember, &sensor_value, 0)) {
        printf("Light sensor value: %i\n", sensor_value);
      }
    } else if (xBlockedMember == q_temperature_sensor) {
      if (xQueueReceive(xUnBlockedMember, &sensor_value, 0)) {
        printf("Temperature sensor value: %i\n", sensor_value);
      }
    } else if (xUnBlockedMember == xSemaphore) {
      // TODO: Do something at 1Hz, such as averaging sensor values
      if (xSemaphoreTake(xUnBlockedMember, 0)) {
        puts("-----------------------------------");
        puts("1Hz signal");
      }
    } else {
      puts("Invalid Case");
    }
  }
}

int main(void) {
  srand(time(0));

  // Create an empty semaphores and the queues to add the data of queues and semaphores to the queueSet
  xSemaphore = xSemaphoreCreateBinary();
  q_light_sensor = xQueueCreate(10, sizeof(sensor_value_s));
  q_temperature_sensor = xQueueCreate(10, sizeof(sensor_value_s));

  // Make sure before creating a queue set Queues and the semaphore we want to add to the queue sets are empty.
  // Length of the queue set is important -> Q1:10 | Q2:10 | Semaphore:1
  xQueueSet = xQueueCreateSet((10 + 10 + 1) * sizeof(int));

  // Associate the queues and the semaphore to the queue set
  xQueueAddToSet(xSemaphore, xQueueSet);
  xQueueAddToSet(q_light_sensor, xQueueSet);
  xQueueAddToSet(q_temperature_sensor, xQueueSet);

  xTaskCreate(semaphore_task, "semaphore task", 2048/(sizeof(void*)), NULL, 1, NULL);
  xTaskCreate(light_sensor_task, "light", 2048, NULL, 1, NULL);
  xTaskCreate(temperature_sensor_task, "temperature", 2048, NULL, 1, NULL);
  xTaskCreate(consumer, "single consumer", 4096, NULL, 2, NULL);
  vTaskStartScheduler();
}
Additional Information
Semaphores
This article provides examples of various different Semaphores.
Binary Semaphore
A binary semaphore is a signal. In FreeRTOS, it is nothing but a queue of 1 item.
#include "semphr.h"
#include "queue.h"

// Queue of 1 item
static SemaphoreHandle_t binary_semaphore;

static void lcd_update_task(void *p) {
  while(1) {
    // CONSUME the signal - xQueueReceive()
    puts("lcd_update_task(): Attempting to take the semaphore");
    if (xSemaphoreTake(binary_semaphore, portMAX_DELAY)) {
      // go update the LCD
      printf("%3d: Okay, I will update the LCD\n", (unsigned)xTaskGetTickCount());
    }
  }
}

static void producer(void *p) {
  while (1) {
    if (!xSemaphoreGive(binary_semaphore)) { // xQueueReceive()
      puts("ERROR: Line: 33: Could not give the Binary Semaphore");
    }
    if (!xSemaphoreGive(binary_semaphore)) {
      puts("ERROR: Line 36: Could not give the Binary Semaphore");
    }

    vTaskDelay(1000);
  }
}

int main(void) {
  binary_semaphore = xSemaphoreCreateBinary(); // xQueueCreate(1, 0-byte-payload);

  xTaskCreate(lcd_update_task, "lcd",      1024 * 8, NULL, 2, NULL); // High priority
  xTaskCreate(producer,        "producer", 1024 * 8, NULL, 1, NULL); // Low priority

  vTaskStartScheduler(); // this function doesn't return
  return 0;
}
Counting Semaphore
#include "semphr.h"
#include "queue.h"

// Queue of 1 item
static SemaphoreHandle_t counting_semaphore;

static void lcd_update_task(void *p) {
  while(1) {
    // CONSUME the signal - similar to: xQueueReceive()
    //puts("lcd_update_task(): Attempting to take the semaphore");
    if (xSemaphoreTake(counting_semaphore, portMAX_DELAY)) {
      // go update the LCD
      printf("%3d: Okay, I will update the LCD\n", (unsigned)xTaskGetTickCount());
    }
  }
}

static void producer(void *p) {
  while (1) {
    xSemaphoreGive(counting_semaphore);
    // ...
    xSemaphoreGive(counting_semaphore);

    vTaskDelay(3000);
  }
}

int main(void) {
  //binary_semaphore = xSemaphoreCreateBinary(); // xQueueCreate(1, 0-byte-payload);
  counting_semaphore = xSemaphoreCreateCounting(1, 0);

  xTaskCreate(lcd_update_task, "lcd",      1024 * 8, NULL, 2, NULL); // High priority
  xTaskCreate(producer,        "producer", 1024 * 8, NULL, 1, NULL); // Low priority

  vTaskStartScheduler(); // this function doesn't return
  return 0;
}
Mutex
A mutex stands for "Mutual Exclusion".
#include "semphr.h"
#include "queue.h"

static SemaphoreHandle_t mutex; // Mut = Mutual, and ex = Exclusion

static int global_counter;
static void write_file(const char * file, const char * data) {
  ++global_counter;
}

static void log_write_task(void *p) {
 int counter = 0;
  while (counter++ < 5 * 1000 * 1000) {
    if (xSemaphoreTake(mutex, 1000)) {
      write_file("log.txt", "... data to write ...");
      xSemaphoreGive(mutex);
    }
  }
  printf("Global counter value: %d\n", global_counter);
  vTaskSuspend(NULL);
}

static void file_write_task(void *p) {
 int counter = 0;
  while (counter++ < 5 * 1000 * 1000) {
    if (xSemaphoreTake(mutex, 1000)) {
      write_file("config_file.txt", "... data to write ...");
      xSemaphoreGive(mutex);
    }
  }
  printf("Global counter value: %d\n", global_counter);
  vTaskSuspend(NULL);
}

// Interesting fact:
// "Safe" RTOS variants do not have Mutexes
// So what do they want us to do???
void file_write_in_safe_rtos_applications(void *p) {
  while (1) {
    xQueueReceive(file_write_request);
    write_file(file_write_request.name, file_write_request.data);
  }
}

static void file_write_task(void *p) {
  while(1) {
    file_write_request;
    file_write_request.name = "config.txt";
    file_write_request.data = "data";
    file_write_request.queue_handle_to_respond_back_with_status;

    xQueueSend(file_write_request);
    xQueueReceive(queue_handle_to_respond_back_with_status);
  }
}

static void log_write_task(void *p) {
  while(1) {
    file_write_request;
    file_write_request.name = "log.txt";
    file_write_request.data = "data";
    file_write_request.another_queue;

    xQueueSend(file_write_request);
    xQueueReceive(another_queue);
  }
}

int main(void) {
  // binary_semaphore = xSemaphoreCreateBinary(); // xQueueCreate(1, 0-byte-payload);
  // counting_semaphore = xSemaphoreCreateCounting(1, 0);
  // mutex = xSemaphoreCreateCounting(1, 1);
  mutex = xSemaphoreCreateMutex();

  xTaskCreate(log_write_task, "lcd",      1024 * 8, NULL, 2, NULL); // High priority
  xTaskCreate(file_write_task,"producer", 1024 * 8, NULL, 2, NULL); // Low priority

  vTaskStartScheduler(); // this function doesn't return
  return 0;
}
Recursive Mutex
// RECURSIVE mutex
// Popular TCP/IP library: LwIP
int x;

void some_nested_code() {
  if (xSemaphoreTake(mutex)) {
    // No other task will get the mutex
    x++;
    xSemaphoreGive(mutex); // will not return the mutex
  }
}

void task(void *p)  {
  while (1) {
    if (xSemaphoreTake(mutex)) {
      // No other task will get the mutex
      some_nested_code();
      x++;
      xSemaphoreGive(mutex);
    }
  }
}
Applications
Handle multiple Queues
APIs to avoid
This article lists FreeRTOS APIs that are discouraged from being used.
[warning: this article is under construction]
Just because an API exists does not mean it should be used. Different programmers have different guidelines sometimes, but ultimately it is up to you to ensure that your RTOS application is performing deterministic operations. Operations such as dynamic memory usage, dynamic task or queue usage encourages the creation of non deterministic RTOS behavior, and becomes a maintenance issue.
Fundamental Guidance
Create or allocate all resources before the RTOS starts, and after the RTOS has started, avoid any API usage that can cause the system to fail.
Avoid Deletion API
vTaskDelete
Theoretically, you can create a task after the RTOS is running, and while the RTOS is running, you could delete a task. In practice, however, it is discouraged to create tasks, and then to delete tasks. A task should not be created if it is going to be deleted because there are better options to handle this scenario.
Let us use a practical example. Let us assume that there is a task responsible to play an MP3 song. In place of creating a task to do this work, and then to delete the task when the playback is completed, it is better to consider alternate options:
- Let the task sleep on a semaphore (or a Queue). Once the tasks' work is done, one can block on the semaphore or queue again
- Let the creator of the task also process the code that is meant to run by another dynamically created task
vQueueDelete
Similar to why we should not create or delete a task dynamically, a queue should not be created or deleted dynamically. Fundamentally, dynamic operations such as these encourage or create non-deterministic behavior. Furthermore, depending on the RTOS configuration, the queue may utilize dynamic memory, which may exist at one time, but may not exist at another time during the RTOS runtime.
Fundamental Guidance applies here which is to avoid allocating a resource during runtime. We do not want to deal with queue handles being valid, or invalid. We do not want to run into scenarios when a task is blocked on a queue, and then the queue is deleted to abruptly "pull the plug" and to compromise our running program.
Avoid APIs that facilitate indeterministic behavior
vTaskPrioritySet
A task priority should be set once while creating the task, and it should never be changed again. When tasks priorities change, it is hard to diagnose issues and figure out which tasks are using the CPU at any given time because the priorities are not constant and could be changing.
Using a mutex could alter task priorities, but that is something we can let the RTOS manage by itself. Using a mutex may cause tasks to inherit and disinherit priority of another task, but the RTOS would do that under certain situations to avoid priority inversion issue. This should be considered outside of a developer's control as it is the behavior of the RTOS that is well tested.
If you run into a situation when a task needs to perform some work at a higher priority level, then you could interface to this piece of code using an RTOS construct (Queue or Semaphore), and dedicate the task for this effort and let that task have constant priority.
Avoid Task Notifications
Avoid Queue Sets
Assignments
Multitasking: Hands-on
In this assignment, we will experiment with RTOS tasks and see the multitasking in action. You may use the x86_freertos project folder to experiment with your code since this folder is already setup for the FreeRTOS POSIX simulator.

We will walk you through the different phases of the assignment. Your assignment should be turned in using a Gitlab Merge Request after the entire assignment is complete. You do not need to submit separate code per part.
Part 1: Setup Skeleton
Please setup the skeleton of your code using the reference code below. Requirements for this part are:
- Create a task with an infinite loop that invokes
print_function("++++\n") - Sleep the task for 100 ticks
- Create the task with priority 2
void  eat_cpu() {
  for (int i = 0; i < 1 * 1000 * 1000; i++) {
    ;
  }
}

void print_function(const char *string) {
  for (int i = 0; i < strlen(string); i++) {
    putchar(string[i]);
    eat_cpu();
  }
}

int main(void) {
  // TODO: For you:
  xTaskCreate(printer_task, "name", 1000, NULL, 3, NULL);

  puts("Starting FreeRTOS Scheduler ..... \r\n");
  vTaskStartScheduler();

  return 0;
}
At this point, you should build your code and test it before moving on.
Part 2: Multiple tasks
For this part, let us create two tasks that print a specific pattern. You can leverage from the "task parameter" that you can pass to a task like so:
void printer_task(void *p) {
  const char *what_to_print = (const char*) p;
  while(1) {
    print_function(what_to_print);
  }
}

int main(void) {
  xTaskCreate(printer_task, "name", 1000, "++++\n", 3, NULL);
  ...
Requirements:
- Retain existing that that prints
++++\n - Create a new task that prints
----\n- Create both tasks with priority 2
Build and run the code and note down observations.
Part 3: Round-robin scheduler
So far what we should have observed is that when a task gives up its CPU using vTaskDelay() or another function that "blocks", the time allocation is given to other tasks that may be equal or lower priority. If we deliberately design the code such that tasks do not sleep, then the round-robin scheduler will kick-in. This round-robin scheduler requires "preemptive scheduler" option which is typically enabled by default by all RTOSes.
void task_1(void *p) {
  const char *what_to_print = "----\n";
  while(1) {
    print_function(what_to_print);
    eat_cpu();
  }
}

void task_2(void *p) {
  const char *what_to_print = "++++\n";
  while(1) {
    print_function(what_to_print);
    eat_cpu();
  }
}

int main(void) {
  //xTaskCreate(cpu_utilization_print_task, "cpu", 1, NULL, PRIORITY_LOW, NULL);

  xTaskCreate(task_1, "name", 1000, "++++\n", 3, NULL);
  xTaskCreate(task_2, "name", 1000, "****\n", 3, NULL);

  puts("Starting FreeRTOS Scheduler ..... \r\n");
  vTaskStartScheduler();

  return 0;
}
Assignment Submission
At this point you should have performed a number of experiments to get to know the RTOS scheduler. Note that all RTOSes will behave the same way. The scheduling policy is always A) High priority first, and then B) Round-robin scheduling between equal priority tasks.
Please create a README.MD file and add that to your MR to explain the following:
- Change the priority of the
++++task to 2, and the priority of the----task to 1- Have the
++++task invoke vTaskDelay(100) - What is the output of the code?
- Have the
- Change the priorities of both tasks to 1
- What is the output of the code?
- What is different from the previous part?
- Remove the vTaskDelay(100) with eat_cpu()
- Use equal priorities for both tasks
- What is the output of the code?
- With equal priorities, make a change at FreeRTOSConfig.h and set
#define configUSE_PREEMPTION 0- Ensure that you modify the FreeRTOS file at your project folder, such as x86_freertos
- What is the output of the code?
- Explain how the pre-emption option is behaving
Thread Stack
FreeRTOS port
Objective:
Understanding the FreeRTOS Portable Layer.
The objective of this assignment is to understand the FreeRTOS portable layer and how it allows FreeRTOS to run on various hardware architectures. By the end of this assignment, students should be able to explain the role of the portable layer and demonstrate their understanding by analyzing an existing port, specifically the POSIX port.
Tasks:
-
Research and Study:
- Read the FreeRTOS documentation on the portable layer.
- Study the implementation of the portable layer for an existing architecture, such as ARM Cortex-M (found in
FreeRTOS/Source/portable/GCC/ARM_CM4F).
-
Explain the Portable Layer:
- Write a detailed report (2-3 pages) explaining the role of the FreeRTOS portable layer. Include the following points:
- What is the portable layer in FreeRTOS?
- Why is the portable layer necessary?
- Key components of the portable layer (e.g., context switching, stack management, and ISR handling).
- How the portable layer interfaces with the core FreeRTOS kernel.
- Use diagrams
- Write a detailed report (2-3 pages) explaining the role of the FreeRTOS portable layer. Include the following points:
-
Explain a specific Port:
- Choose an existing port (e.g., ARM Cortex-M4) and analyze its implementation.
- Choose a CPU architecture you are familiar with; you can even pick POSIX
- Identify and study the following components:
- Context switch implementation.
- Stack initialization for tasks.
- Interrupt handling and how FreeRTOS interacts with the hardware.
- Any architecture-specific optimizations.
- Choose an existing port (e.g., ARM Cortex-M4) and analyze its implementation.
-
Submit Your Work:
- Submit the following:
- The detailed report on the FreeRTOS portable layer.
- The analysis of the existing port.
- The explanation of the port you selected.
- Submit the following:
Grading Criteria:
-
Report Quality
- Clarity and completeness of the explanation.
- Depth of understanding demonstrated.
- Accuracy and detail in identifying key components of the existing port.
-
POSIX Port Explanation
- Correctness and completeness of the explanation of the POSIX port.
- Clarity and depth of the analysis.
Additional Resources:
- FreeRTOS Documentation
- FreeRTOS Porting Guide
- FreeRTOS Kernel Source Code
- FreeRTOS POSIX Port Documentation
Queues
In this assignment, we will learn about RTOS queues. We will setup three tasks:
- Light sensor task
- Temperature sensor task
- File writer task
This is a classic "Many-to-One" design pattern in RTOS. In this scenario, the File Writer acts as a centralized consumer, while the sensors act as producers. This prevents "resource contention" where two tasks try to write to the same file or serial port at the same time.
The Assignment Objective
-
Create a Queue capable of holding a custom
struct. -
Task 1 & 2 (Producers): Periodically read a (mock) sensor and "Send" the data to the queue.
-
Task 3 (Consumer): Block (sleep) until data arrives in the queue, then "Receive" and print it.
Template
Step 1: Define the Data Structure
Since the File Writer needs to know which sensor sent the data, we use a structure. You could be a bit more fancy and use a "union" for the data structure, but we leave this as an optional exercise for you.
typedef enum {
    SOURCE_LIGHT,
    SOURCE_TEMP
} SensorSource_t;

typedef struct {
    SensorSource_t source;
    int32_t value;
    uint32_t timestamp;
} SensorData_t;

// Global handle for the queue
QueueHandle_t xSensorQueue;
Step 2: The Task Templates
Producer Template (Light & Temp Tasks)
Both sensor tasks will look very similar. You should implement logic to "mock" a sensor reading (e.g., a random number or a counter).
void vSensorTask(void *pvParameters) {
    SensorSource_t mySource = (SensorSource_t)pvParameters;
    SensorData_t xMessage;

    for (;;) {
        // 1. MOCK: Generate a fake sensor value
        xMessage.source = mySource;
        xMessage.value = (mySource == SOURCE_LIGHT) ? 450 : 22;
        xMessage.timestamp = xTaskGetTickCount();

        // 2. SEND: Post to the queue
        // Use a 0ms block time if you don't want to wait if the queue is full
        if (xQueueSend(xSensorQueue, &xMessage, 0) != pdPASS) {
            // Handle queue full error here
        }

        vTaskDelay(pdMS_TO_TICKS(1000)); // Poll every 1 second
    }
}
Consumer Template (File Writer Task)
This task should be the most efficient. It stays in a Blocked state until the queue has data, meaning it consumes 0% CPU while waiting.
void vFileWriterTask(void *pvParameters) {
    SensorData_t xReceivedData;

    for (;;) {
        // 3. RECEIVE: Wait indefinitely (portMAX_DELAY) for data
        if (xQueueReceive(xSensorQueue, &xReceivedData, portMAX_DELAY) == pdPASS) {

            // 4. LOG: Check source and "write" to console/file
            const char* label = (xReceivedData.source == SOURCE_LIGHT) ? "LIGHT" : "TEMP";
            printf("[%u] %s Reading: %d\n", xReceivedData.timestamp, label, xReceivedData.value);
        }
    }
}
Step 3: Main Initialization
The most important part of the assignment is ensuring the queue is created before the tasks start.
int main(void) {
    // Initialize the queue: (Length of 10 items, size of our struct)
    xSensorQueue = xQueueCreate(10, sizeof(SensorData_t));

    if (xSensorQueue != NULL) {
        // Create Producers
        xTaskCreate(vSensorTask, "Light", 1000, (void*)SOURCE_LIGHT, 1, NULL);
        xTaskCreate(vSensorTask, "Temp", 1000, (void*)SOURCE_TEMP, 1, NULL);

        // Create Consumer (Give it a slightly higher priority if data is high-volume)
        xTaskCreate(vFileWriterTask, "Writer", 1000, NULL, 2, NULL);

        vTaskStartScheduler();
    }

    for (;;); // Should never reach here
}
Assignment Challenges:
-
Buffer Overflow: What happens if the
vSensorTaskdelays for 100ms but thevFileWriterTasktakes 500ms to process? (Students should observe the queue filling up). -
Priority Inversion: Change the priorities so the producers are higher than the consumer. Observe how the queue behaves.